
Created in Runthru Instruction
This page was created in Runthru Instruction as was the matching video which is available here : Play the video
Advanced Step Recorder
This article provides an overview of the Advanced Step Recorder in Runthru Instruction. It assumes a working knowledge of the core application.
The purpose of this function is to further speed the creation of training and support materials for a software based business procedure.
When the recorder is active, all clicks and text entry will be combined with screenshots in a preparation state where they can be edited and combined and then converted into Runthru Instruction Frames.
Step 1 - Capturing Steps
The capture of steps is a fast and simple process. A recorder is used to capture the steps performed, but it will ignore many unnecessary actions that are performed with the goal of creating a more succinct, easier to follow user asset. In this section we will learn the basics of capturing procedural steps.
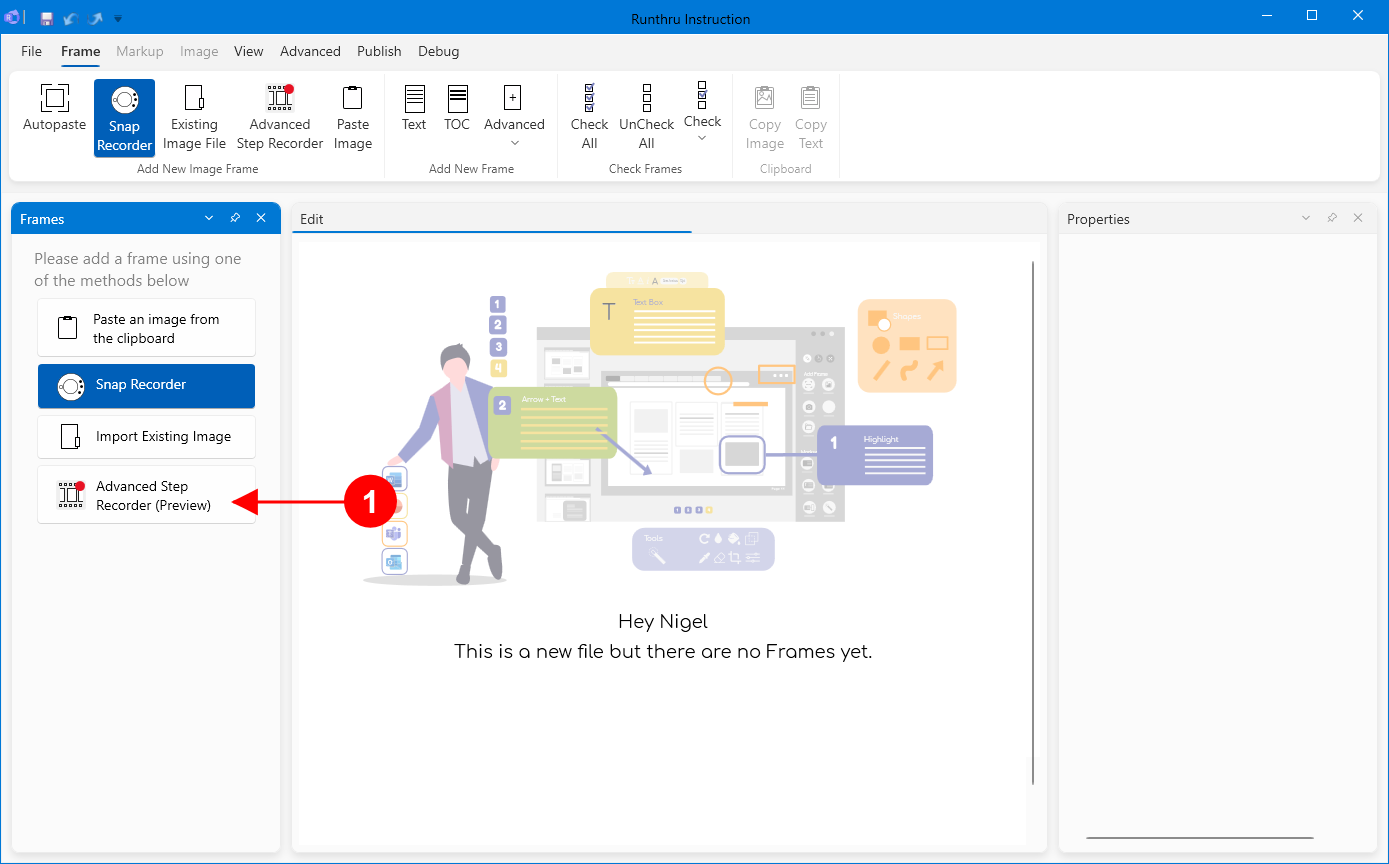

In Runthru Instruction, click the Advanced Step Recorder button.
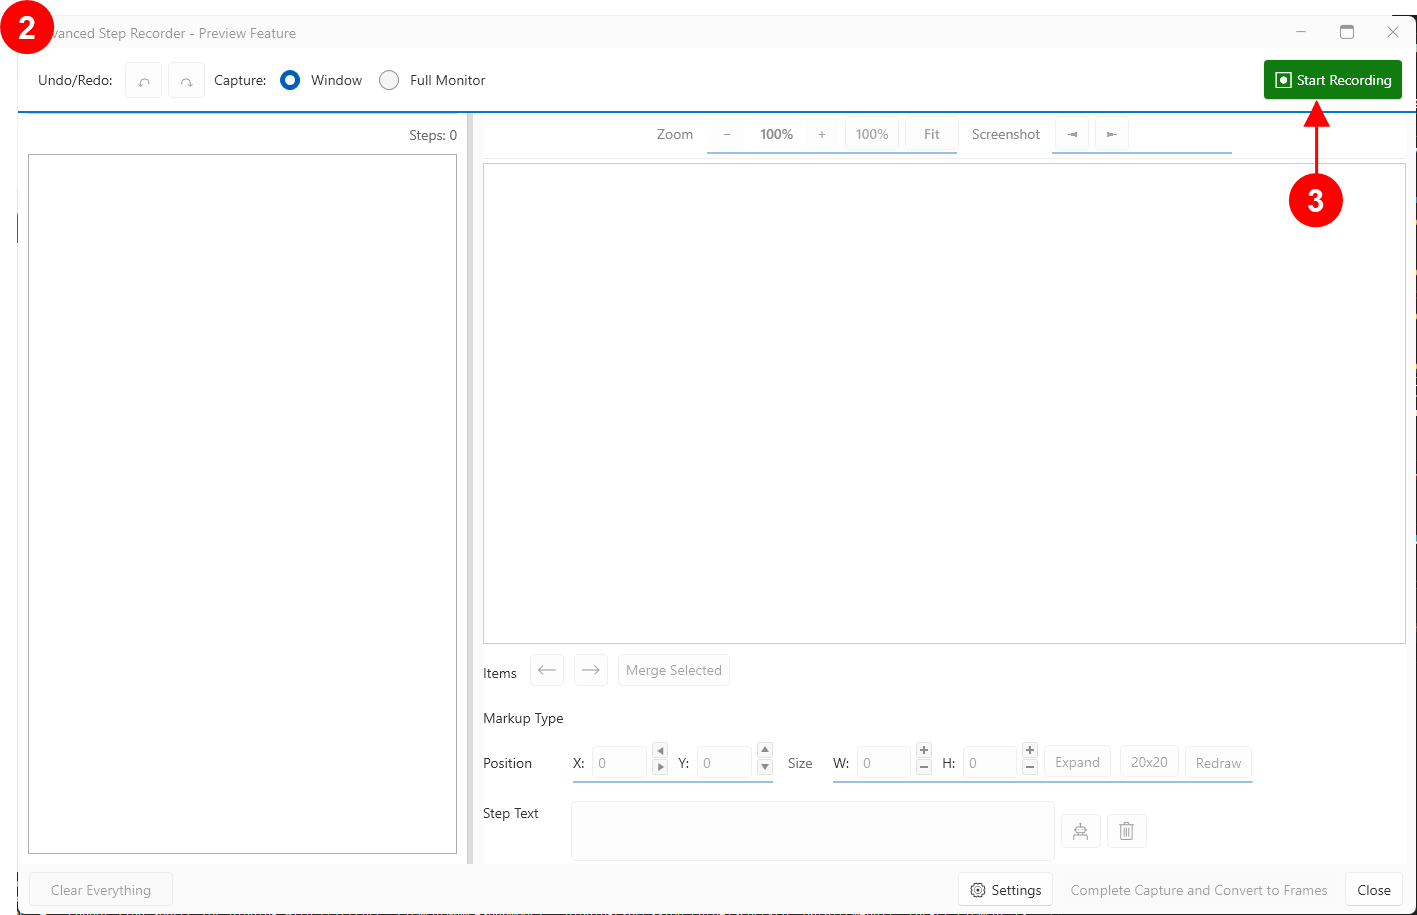

The Advanced Step Recorder window is shown.

Pressing the Start Recording button will trigger the recording engine to start. You can now interact with your target application(s) and the steps will be captured here.
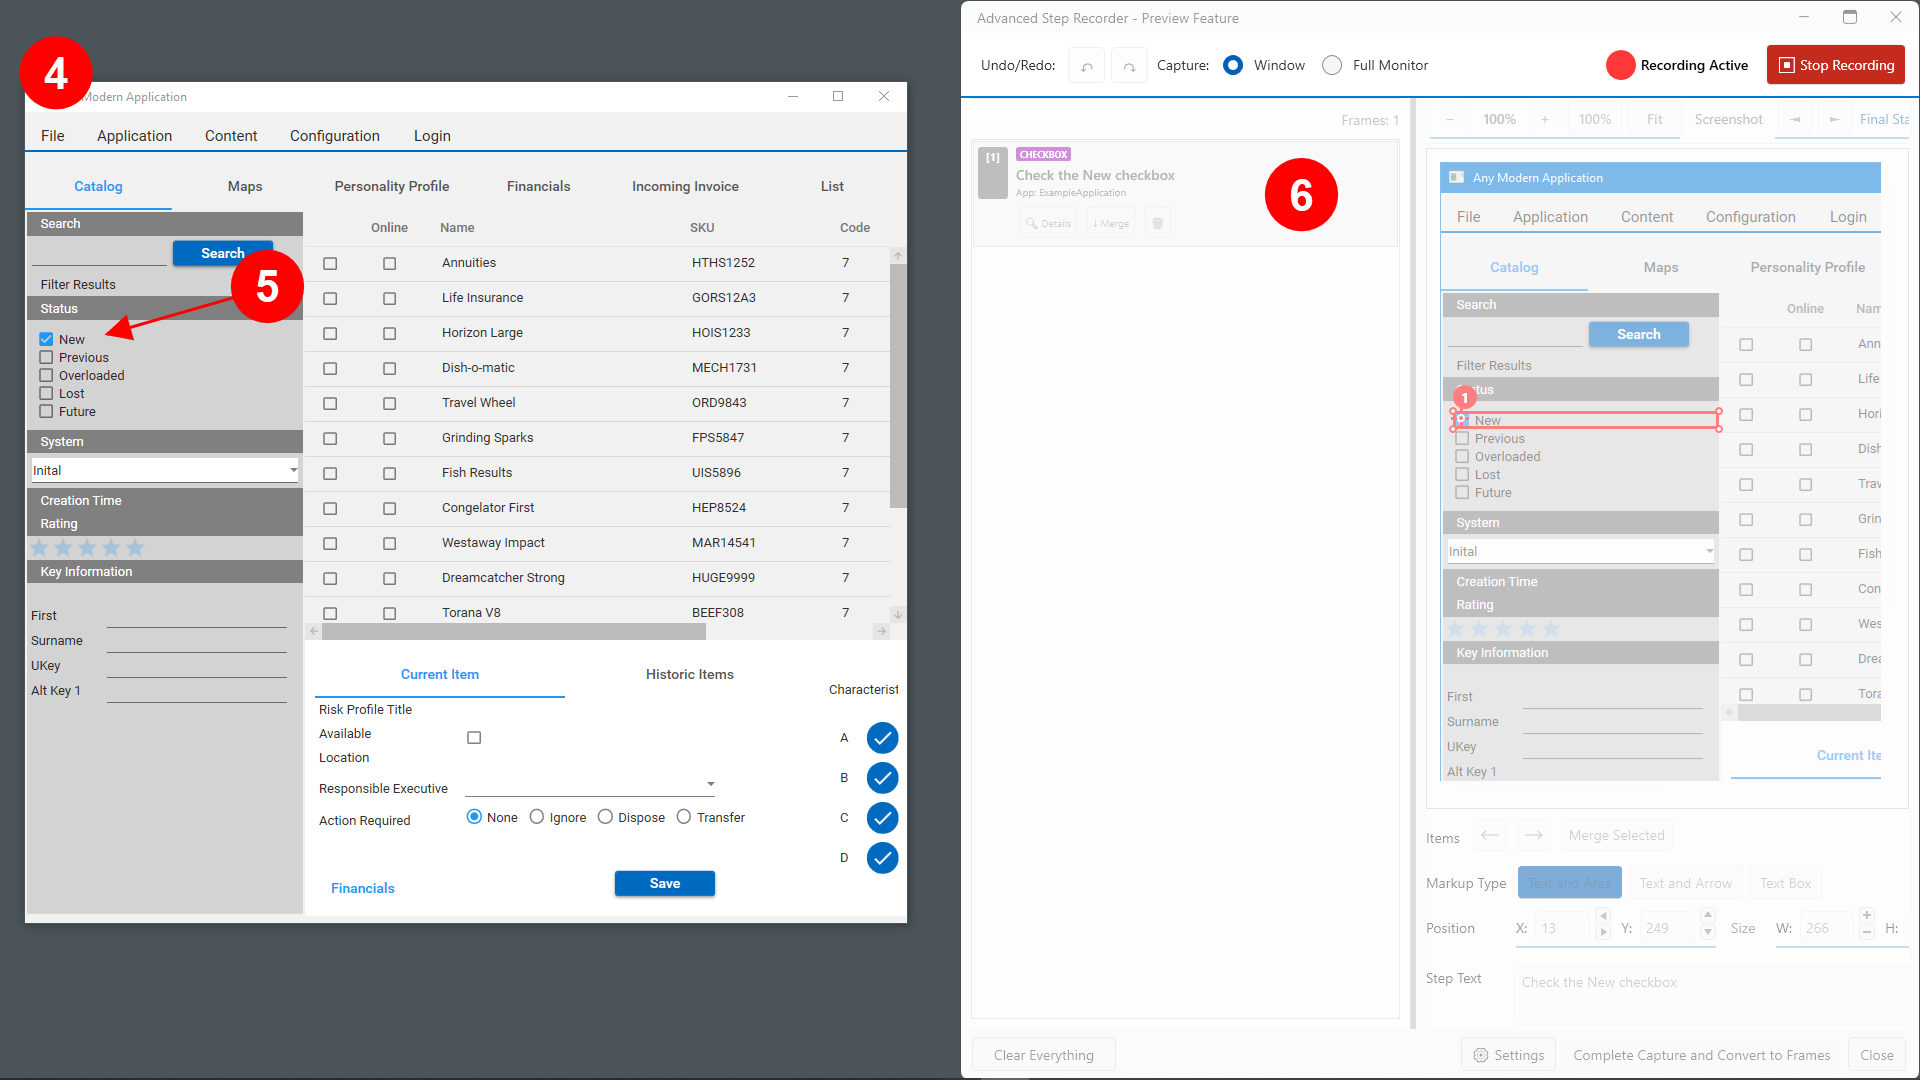

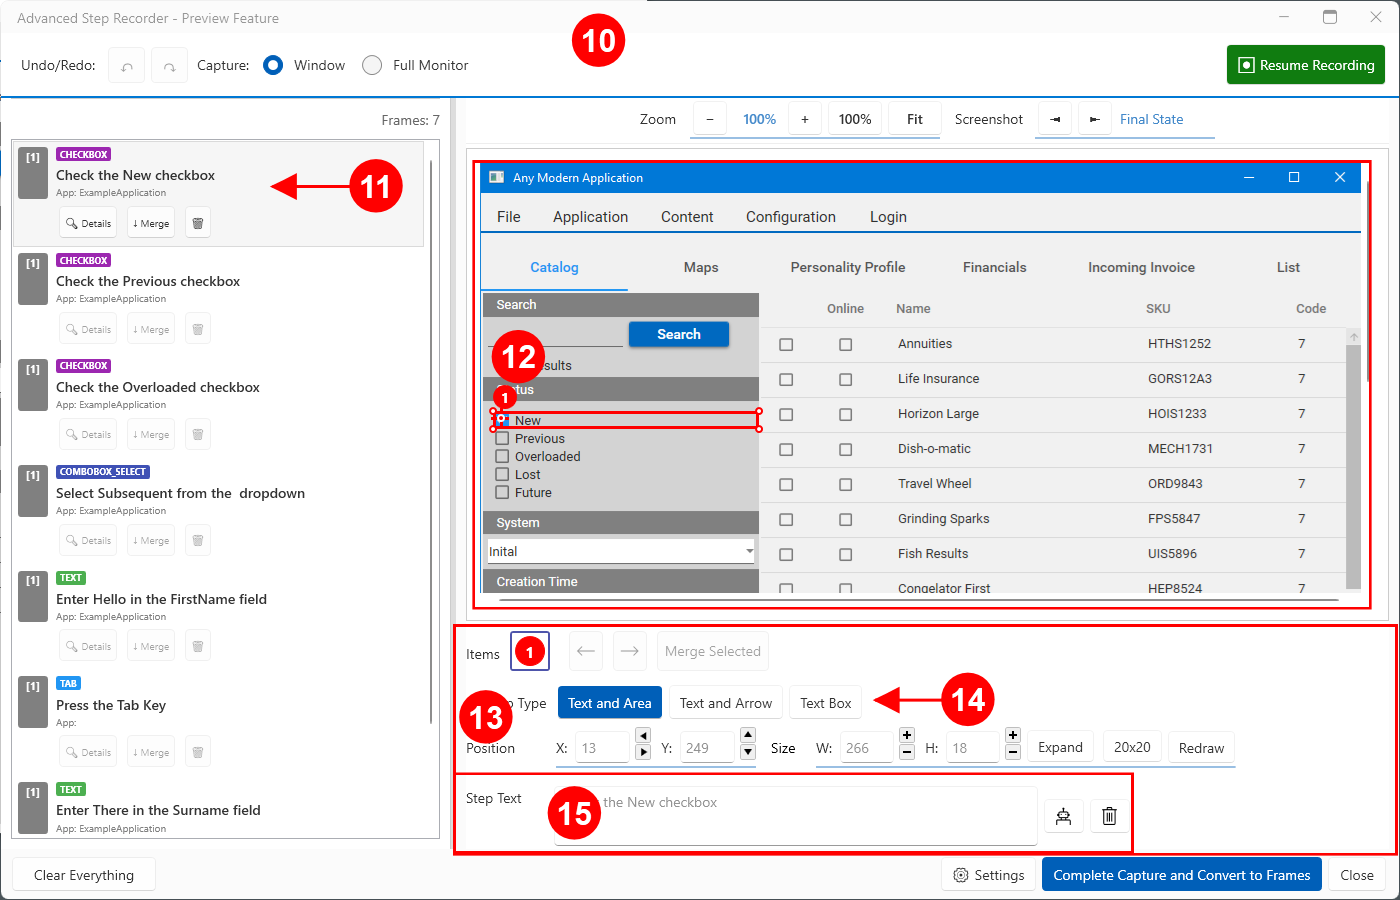
In this image, you can see the target application on the left, and the Advanced Step Recorder on the right. There is no need to have them side by side, and normally the Advanced Step Recorder would be minimised or on a different monitor. They are both shown here for the purposes of explaining their interaction.

As you click on an element in the target application, in this case a Checkbox called New, the Advanced Step Recorder records the interaction.

The result of the user interaction on the target application appears in the Advanced Step Recorder window. The term 'result' is important, as the outcome of this user interaction is that the checkbox is 'checked' not just clicked. The text also accurately describes the outcome.

Continuing to interact with the target application creates additional steps in the Advanced Step Recorder.

You can see the steps being added to the list here. Some unnecessary steps have been automatically removed. An example of a step that has been removed is the click into a text field to make it active.

You can stop the recorder at any time using this button.
Step 2 - Editing and Combining
Once recording has stopped (it can be restarted and any new steps will be added to the bottom of the list), the steps can be edited and combined. This section describes how to improve the captured work in preparation for creation of Frames.

Once the recorder is stopped, you can interact with the steps to prepare them for conversion into Runthru Instruction Frames.

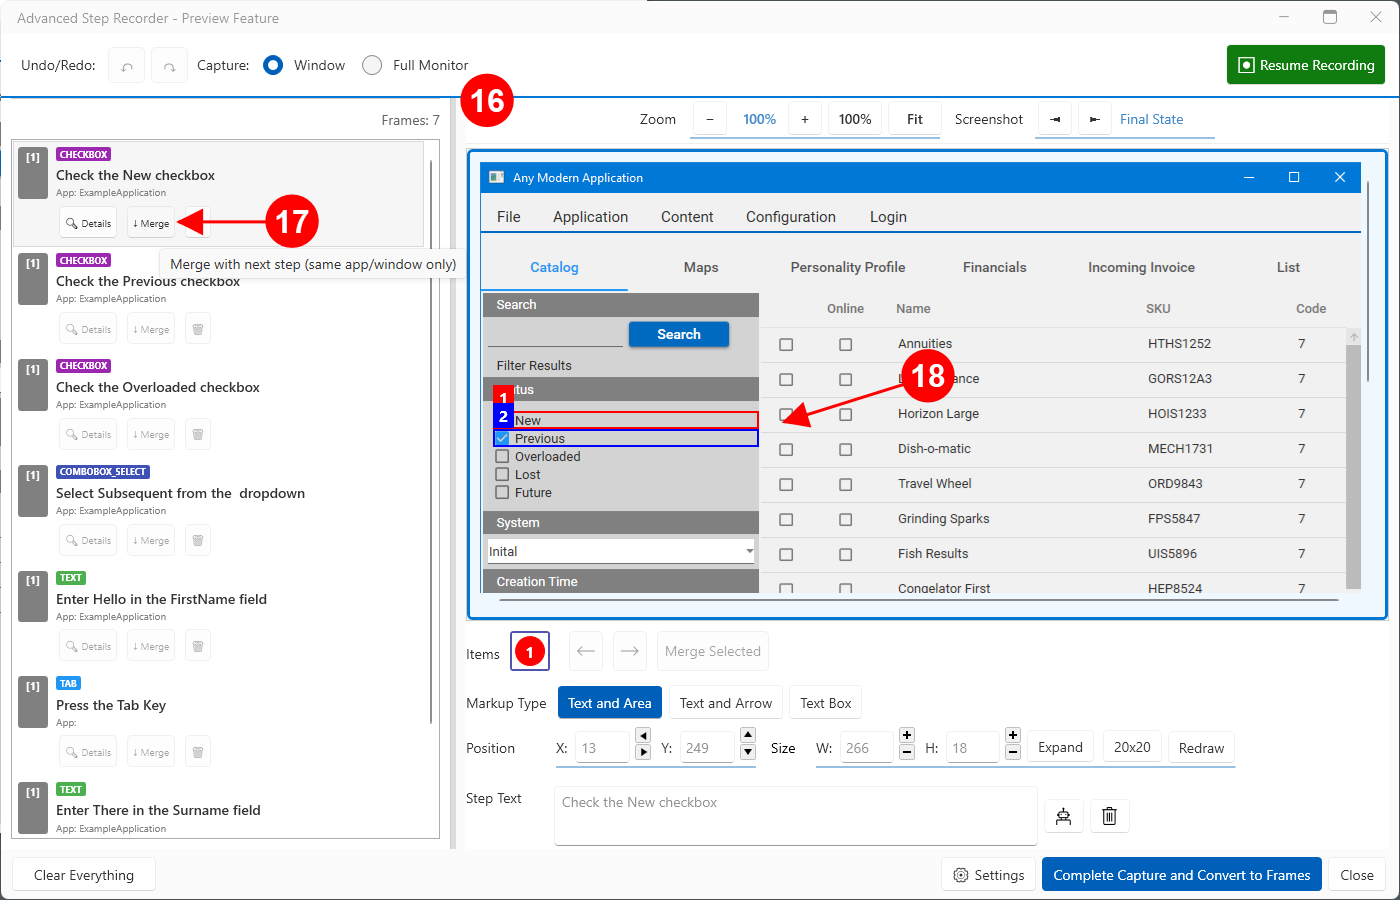
Selecting a Frame allows you to edit the Step(s) in that Frame.

Each Frame has a Screenshot and one or more Steps. Each Step has a rectangle and text. In this example the Frame contains a single Step. In the image panel you can resize and reposition the rectangle using the mouse.

In this panel you can change the position of the rectangle using the buttons and number fields.

When this Step is converted to an Item in the main Runthru Instruction editor, it can have an attached Arrow or Area by selecting one of those options here. When choosing Text and Arrow, or just Text Box, an option to include an additional supporting rectangle will be available (not shown in this image).

Text for the Step is automatically created for you and can be edited here. (your changes will save automatically)

This example currently has seven Frames. If converted now, it will create seven Frames in the main Runthru Instruction editor, each with a single Step/Item. Although accurate, this will create an unnecessarily long file.
It is preferable to reduce the number of Frames and also, if possible, the number of Steps on those Frames.

Each Frame has a Merge button. If the Frame is selected, this Merge button becomes active. Hovering over the button will show a preview of the potential merge with the Frame immediately below it in the list.

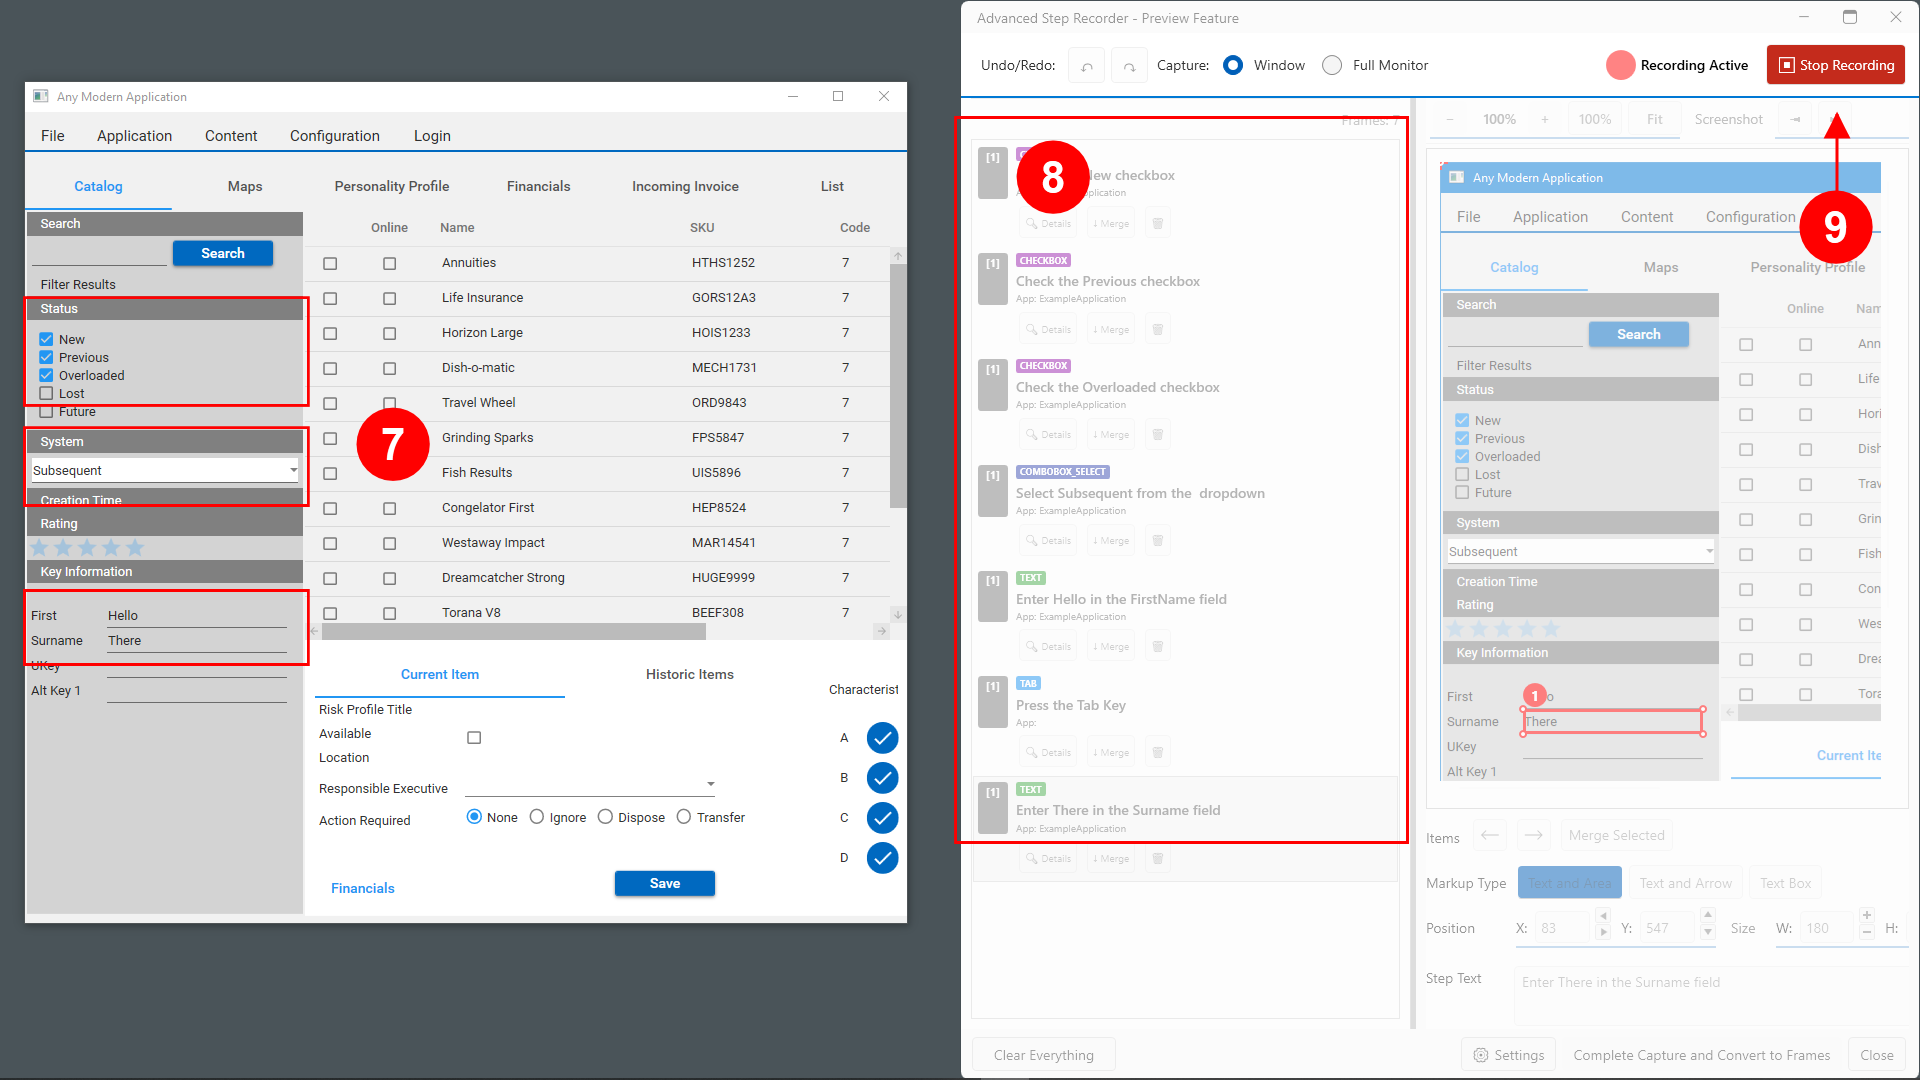
The image now shows this potential merge. In this example we can see that the merge would result in a single Frame showing the selection of New and Previous check boxes. Technically, this is showing you the screenshot belonging to the subsequent step (Check the Previous checkbox) with the rectangles and positioning from both steps.
Clicking on the button will perform the merge.
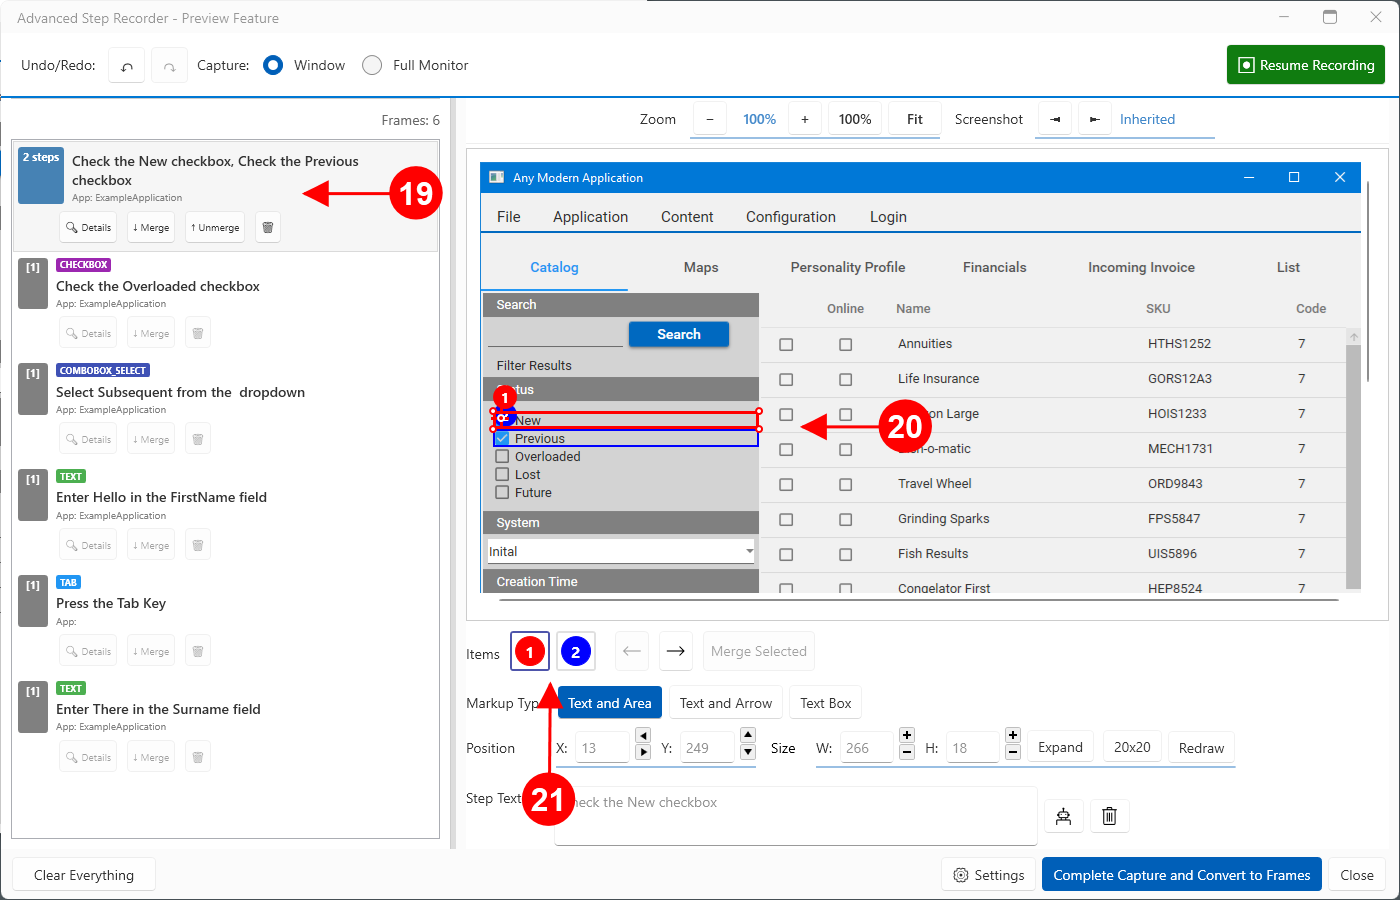

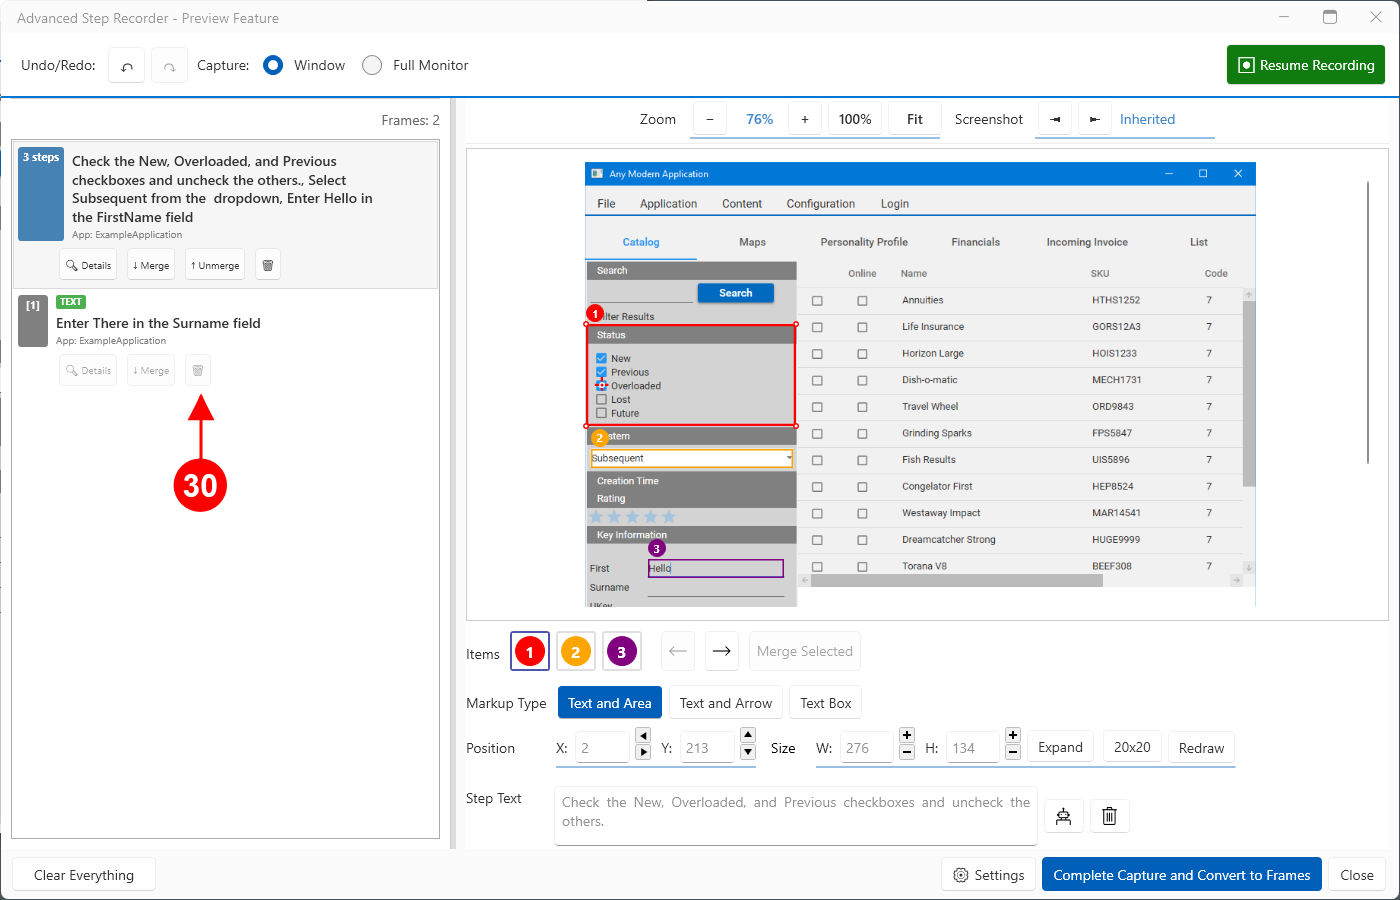
After the Steps are combined, the Frame in the list updates to show that there are now two steps.

The screenshot now shows two rectangles.

Either item can be individually selected here, and edited in the fields below the icons.
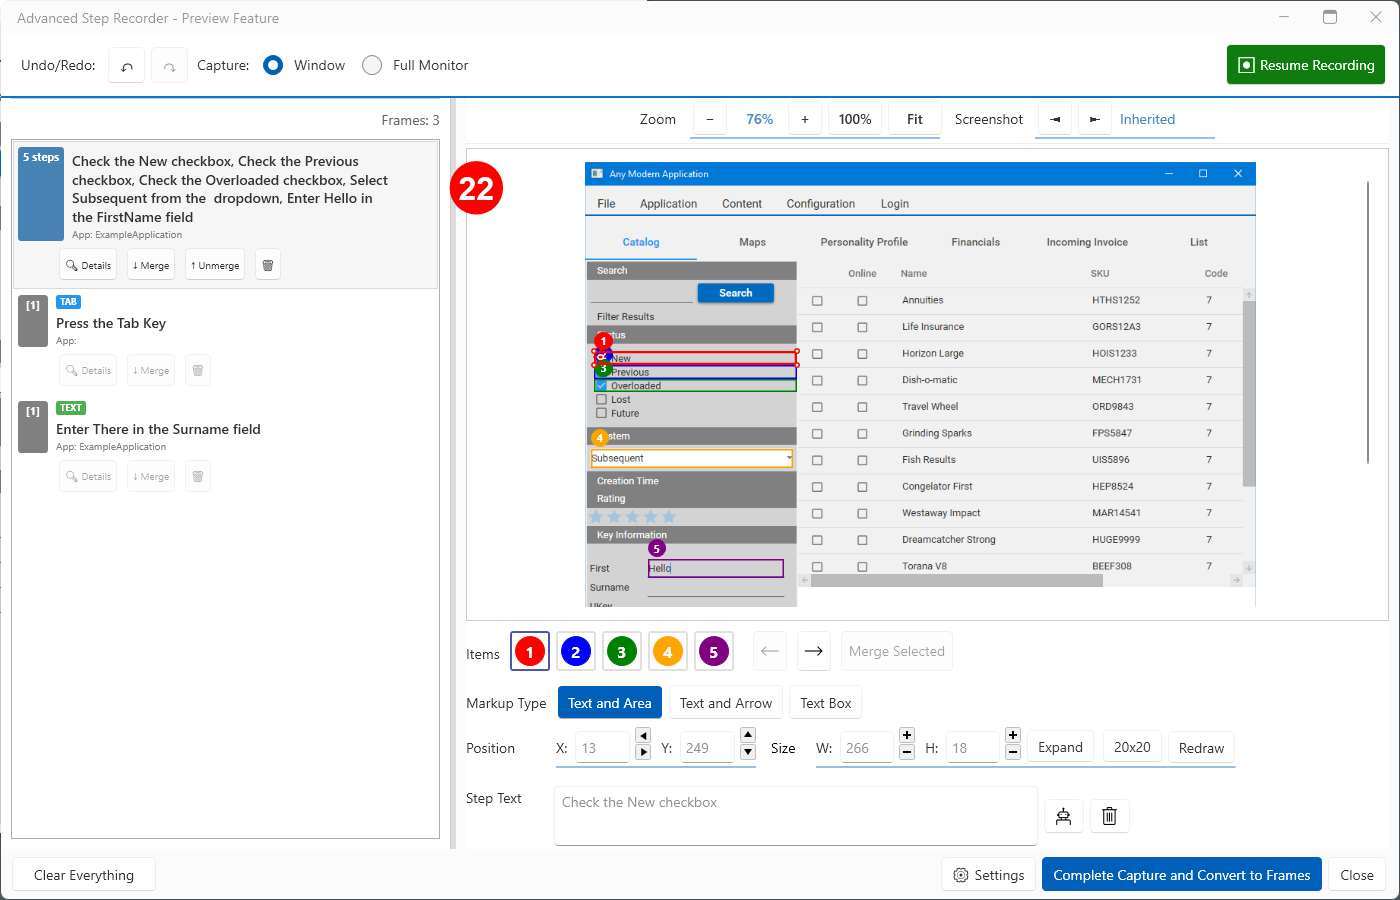

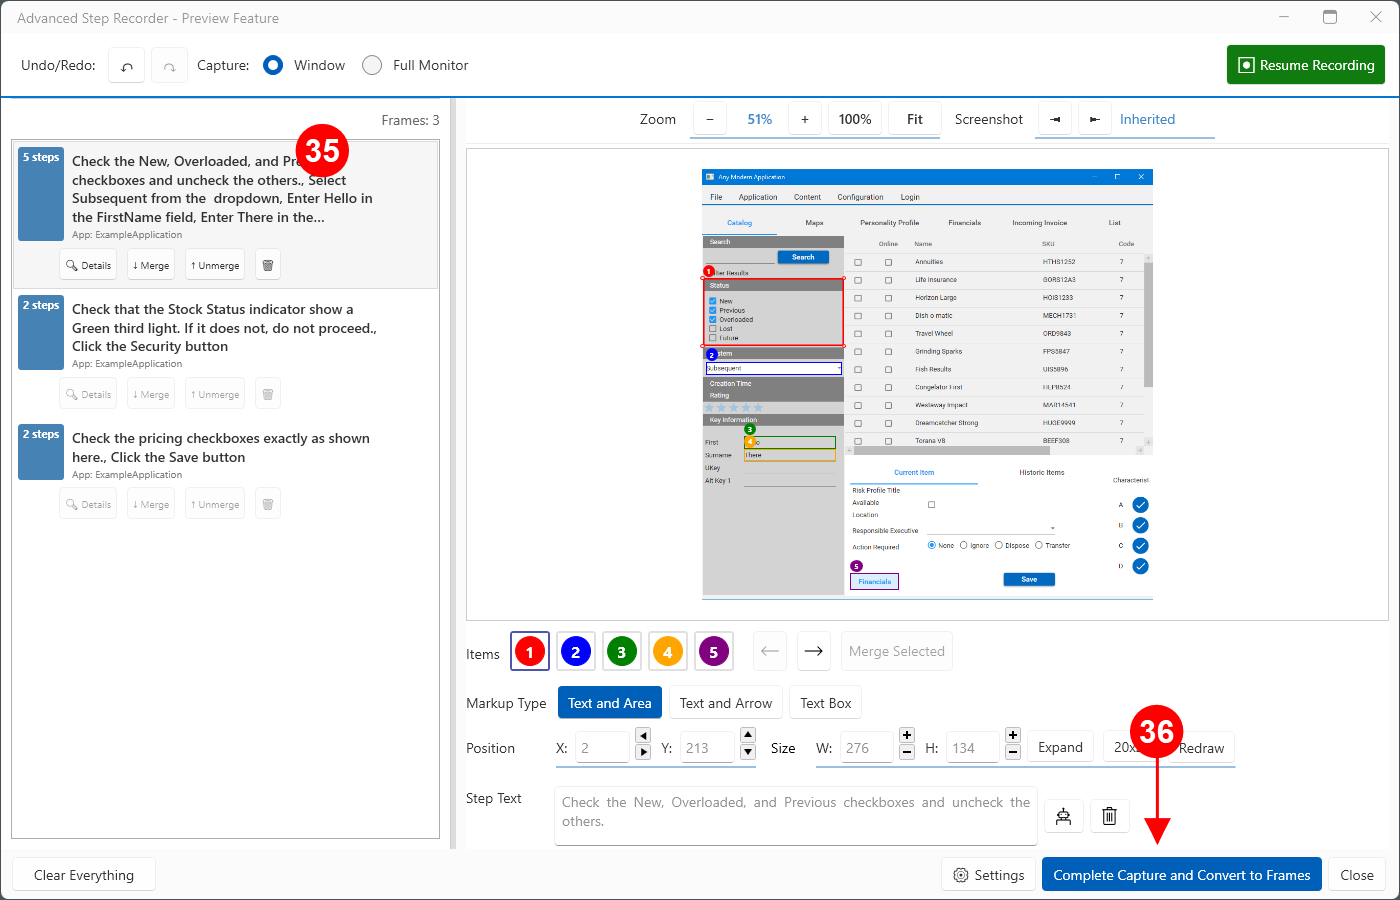
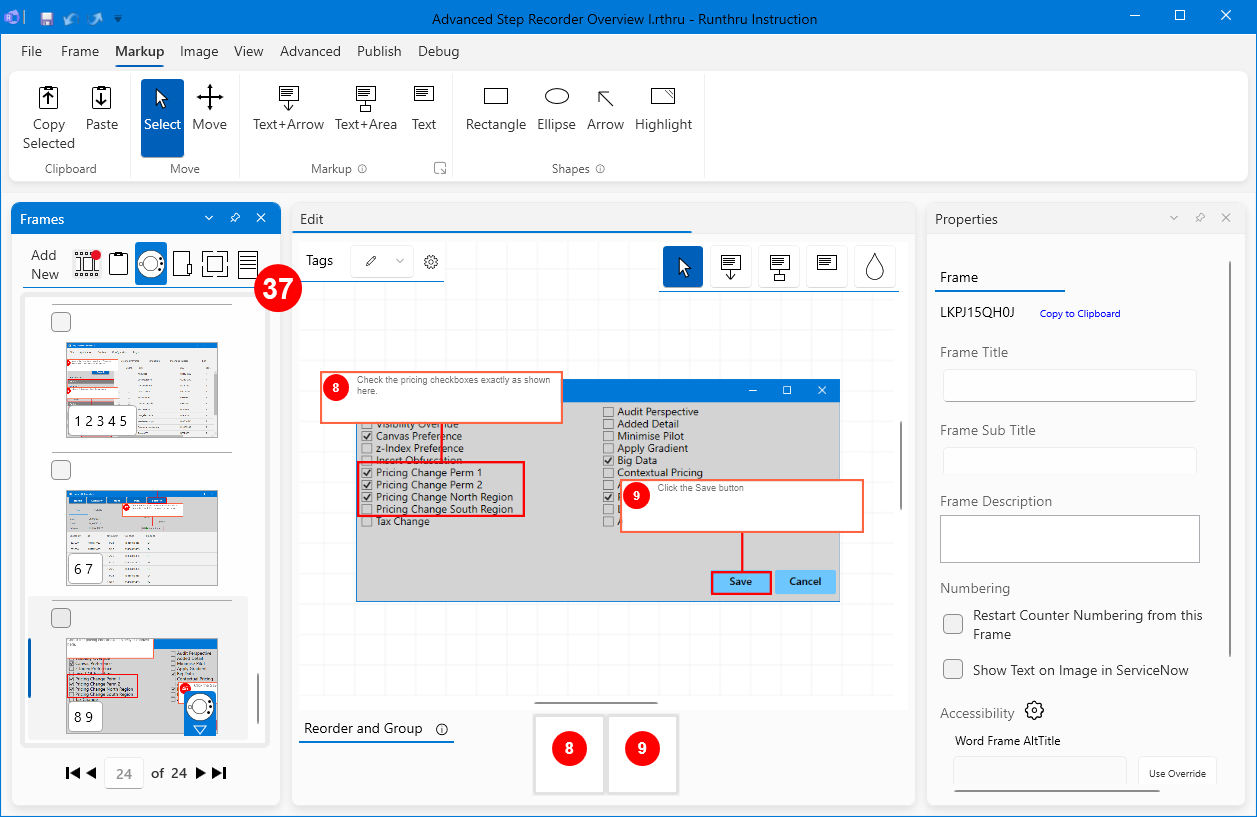
In this image you can see the result of merging additional steps into the one Frame. You will see that the first three are checkboxes, the fourth is a dropdown, and the final step is the entry of text into a text field.
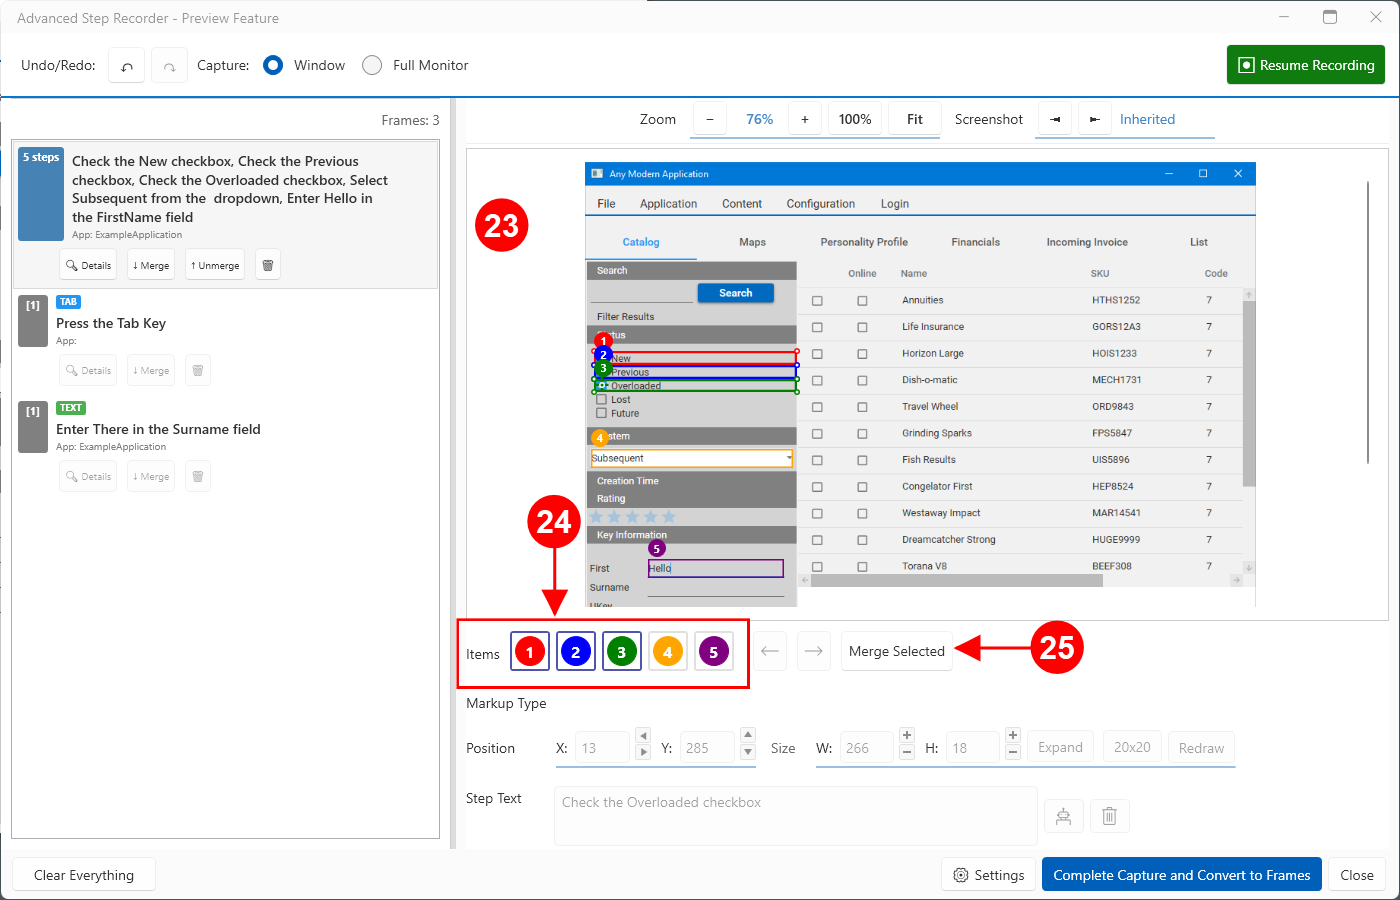

Optionally, steps can be merged where it makes sense to do so. In this example, instructing the user to check three checkboxes as a single instruction could simplify the final article, without a loss of quality.

To merge the desired steps, in this case 1,2 and 3. Select them using the mouse and keyboard (CTRL-Click).

Pressing the Merge Selected button, will combine them into one step.
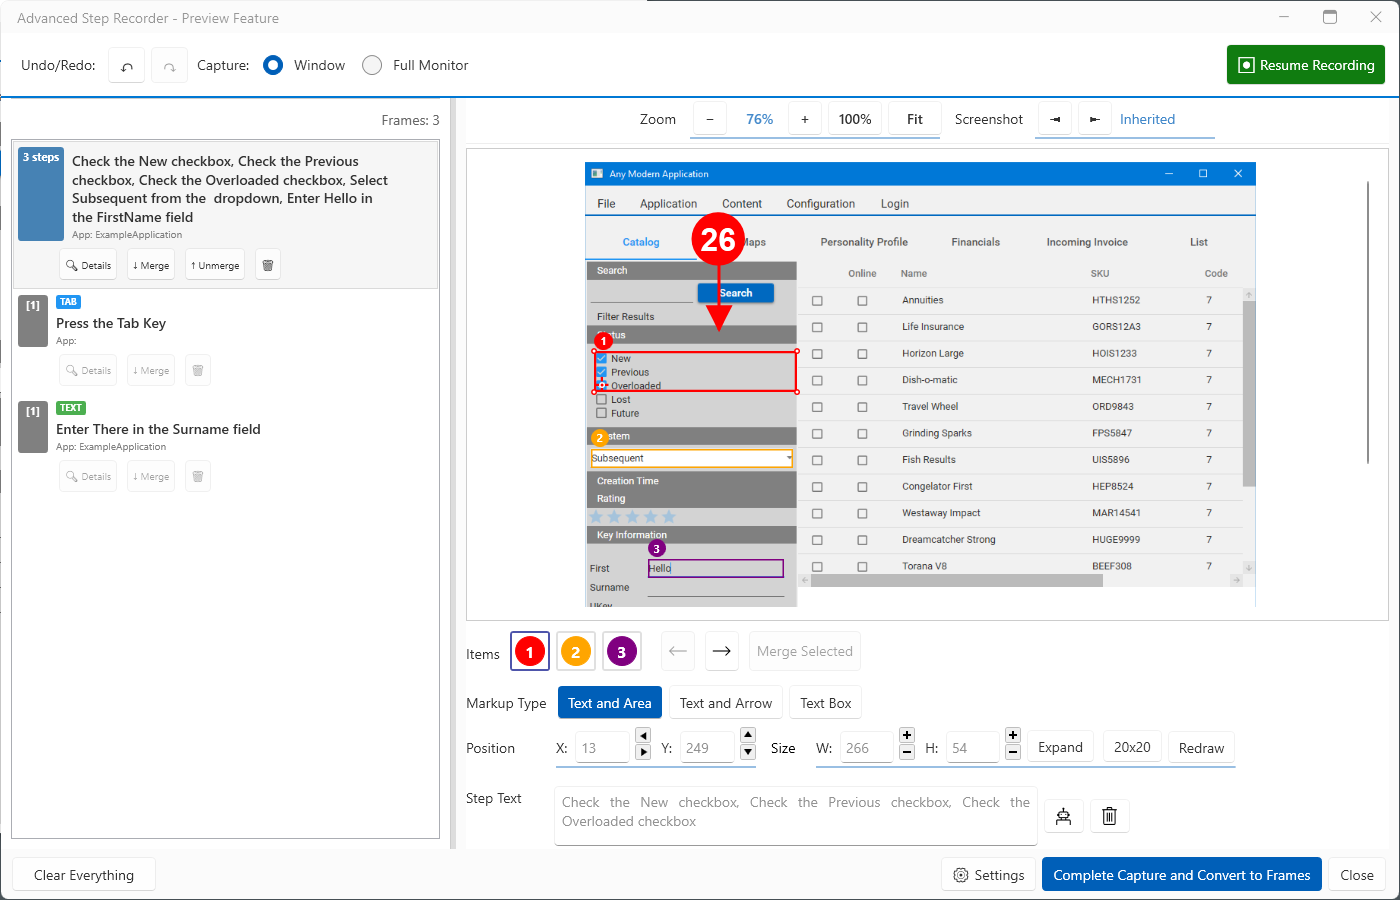

The action of merging will combine the rectangles on the image, and the text in the Step Text field.

In this case we will also resize the newly created rectangle to highlight the whole checkbox area.

In addition we have improved the text to describe the combined steps.

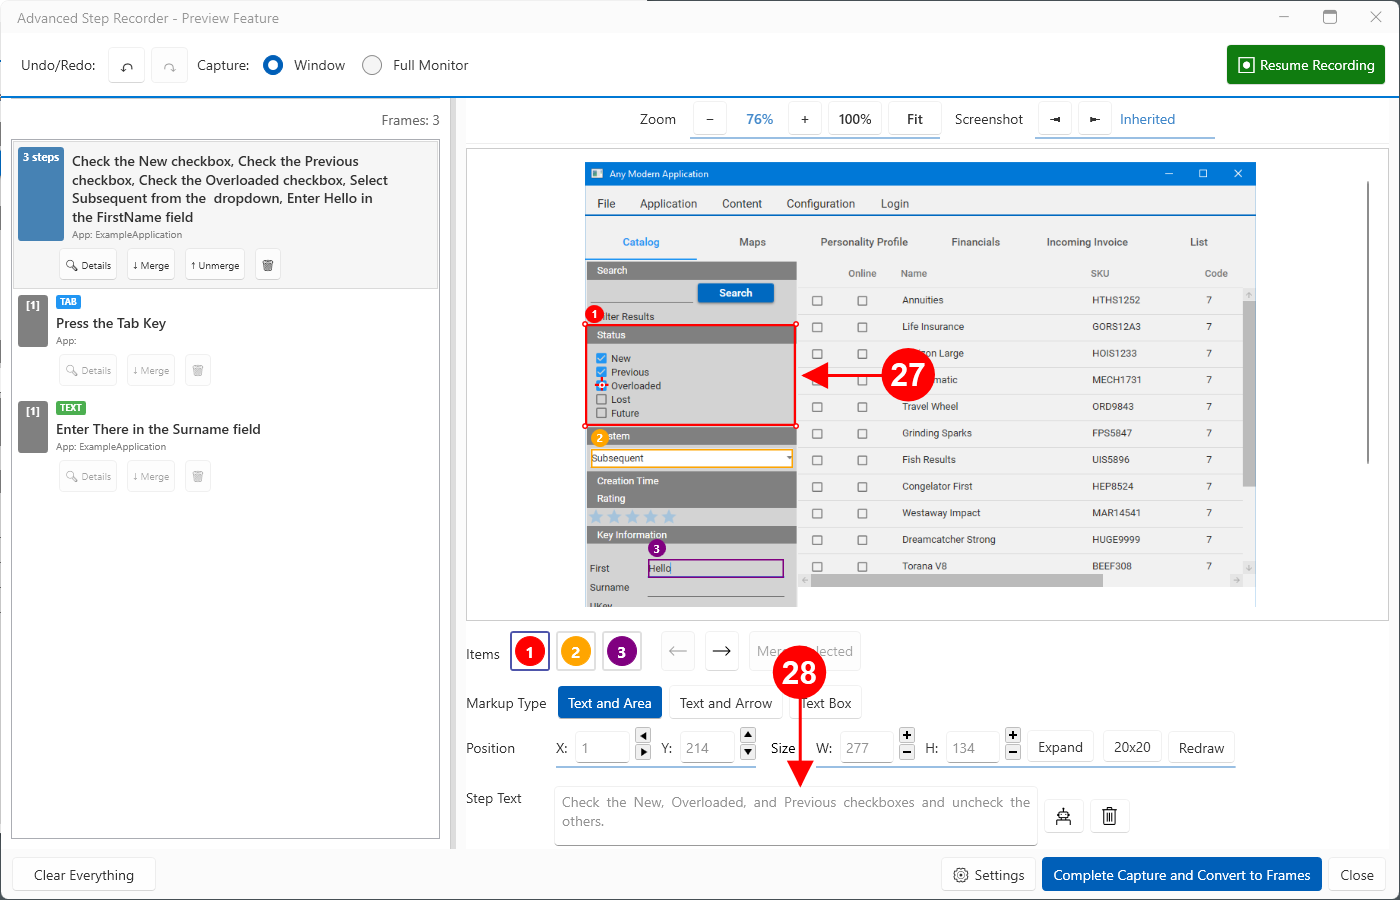
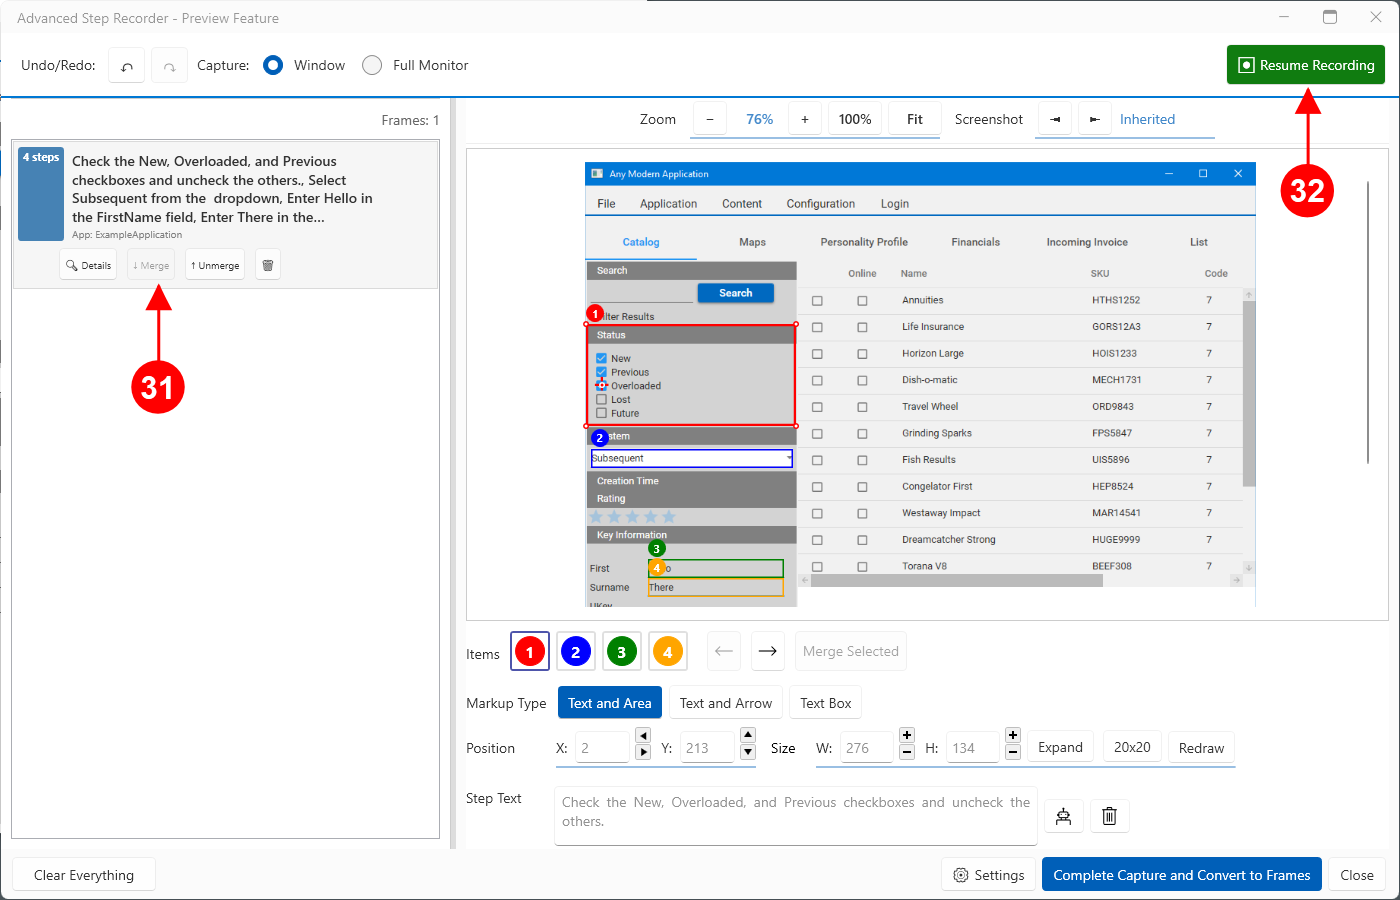
In some cases, you may have redundant or unwanted steps. This Tab step was created when the Tab key was pressed to move between the two text fields. We will remove this step by clicking the delete button.

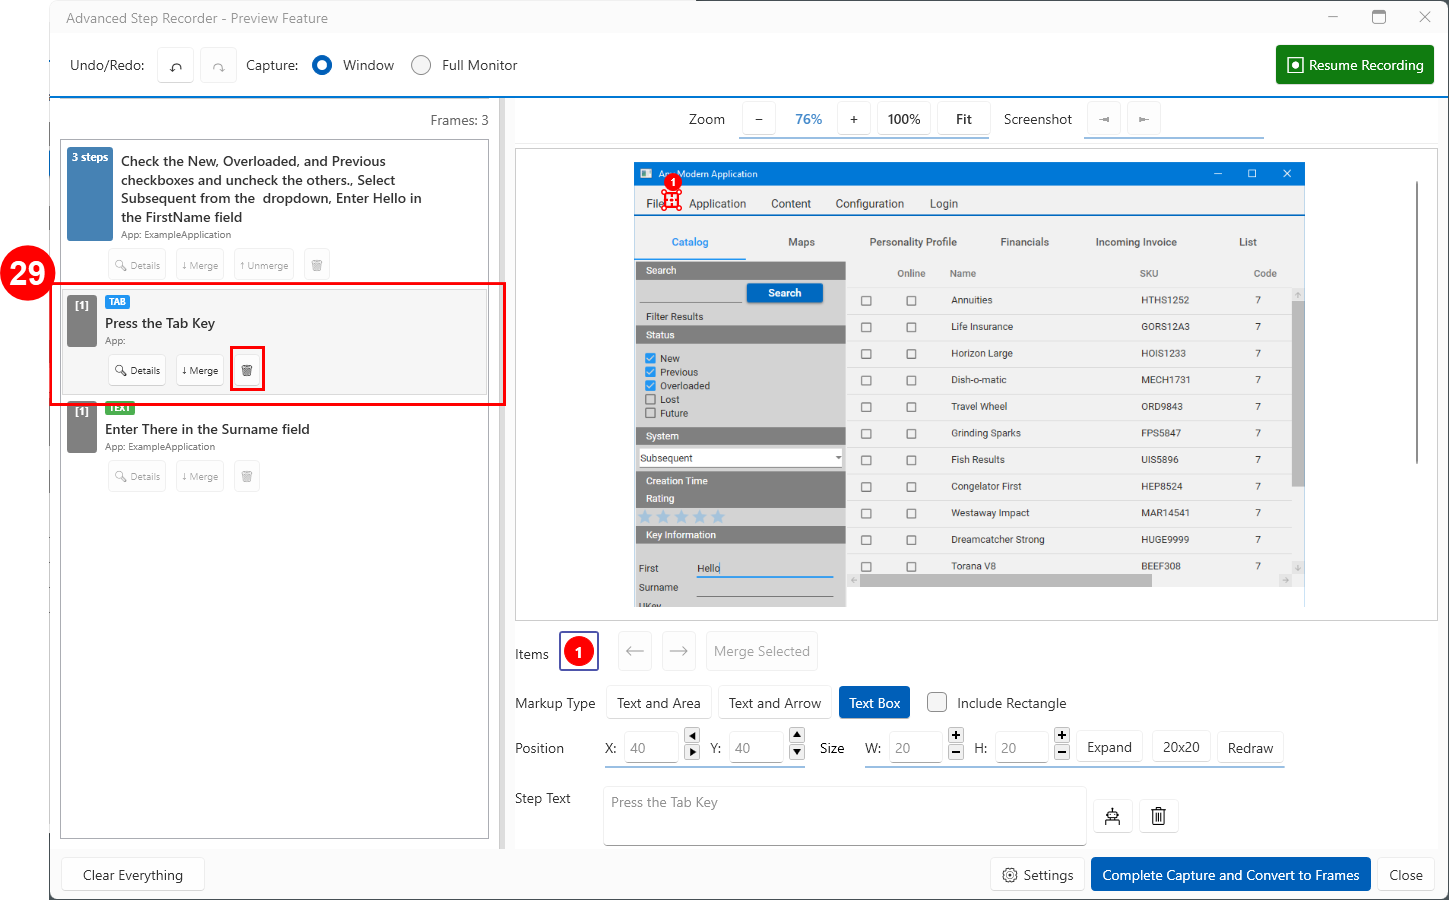
Our example now shows two Frames, with four Steps in total.

Merging these, produces a single Frame, and will result in a more succinct, easier to maintain, user document.

We will Resume Recording to add additional Steps.
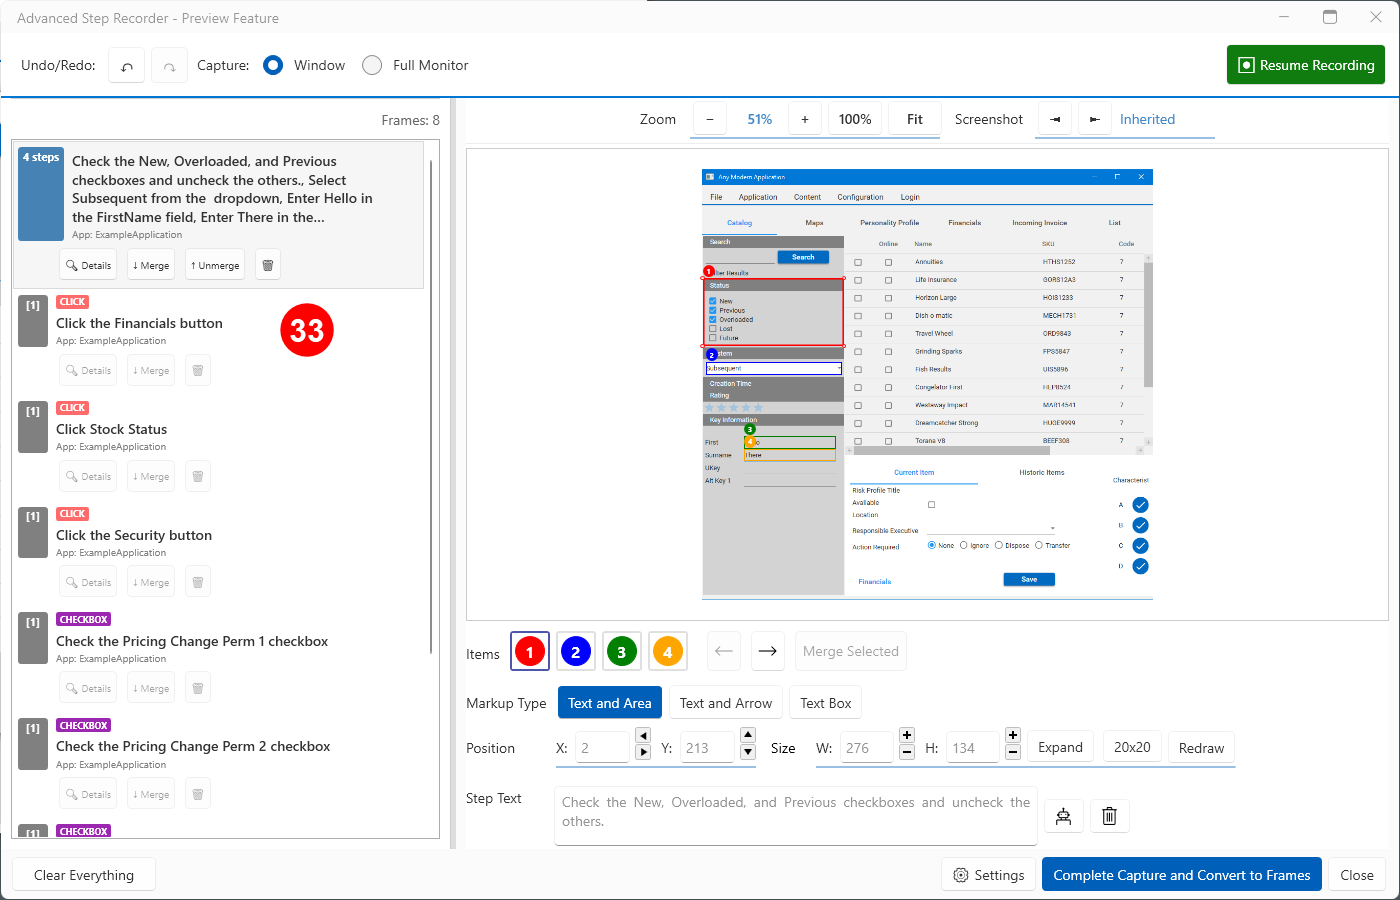

Here we have added additional steps ready for merging and editing. Using the same methods described earlier we can produce an optimal result.
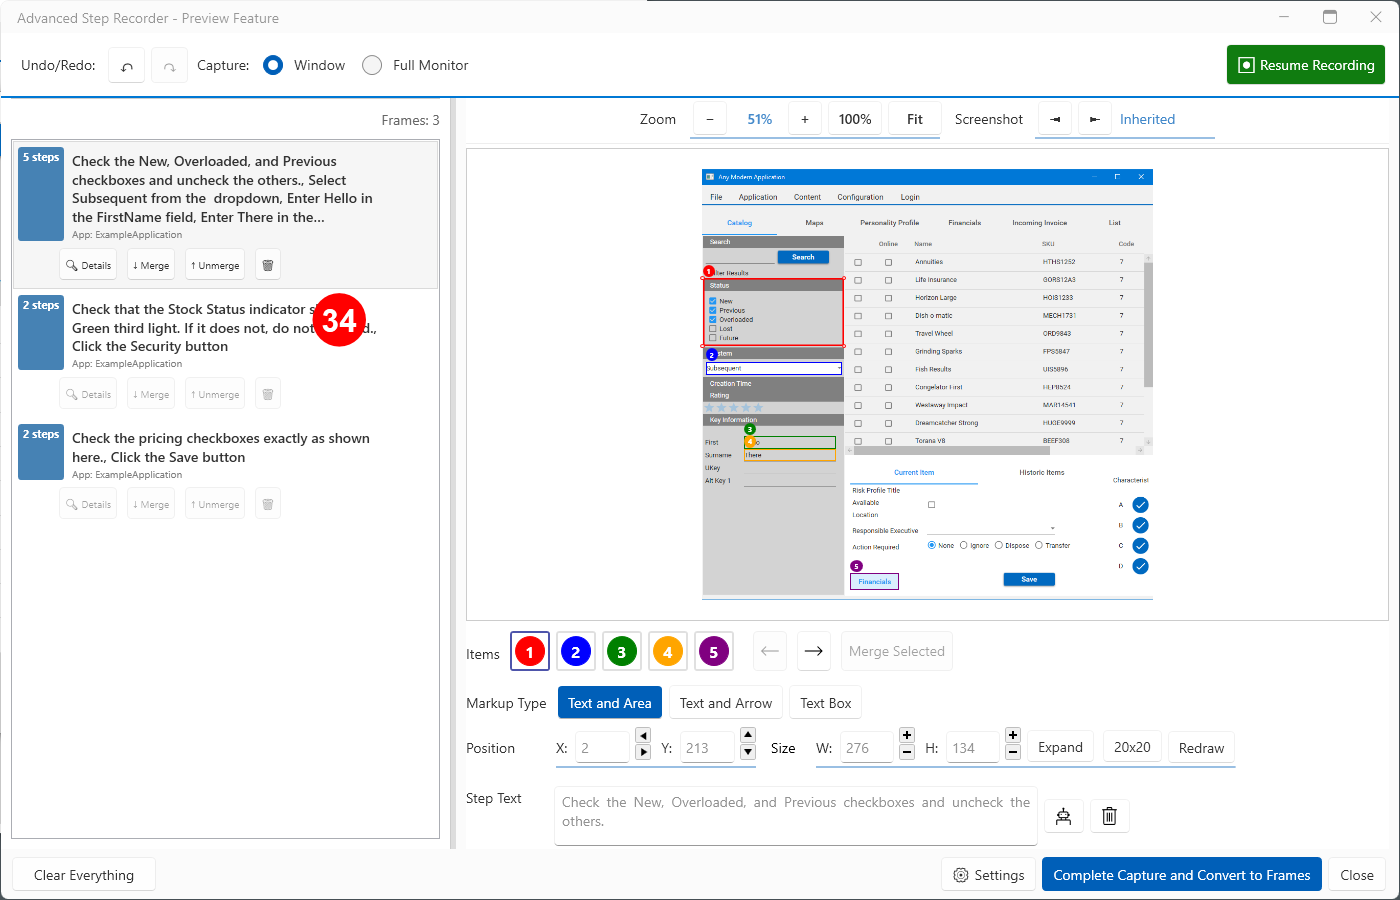

The result, in this example, is three Frames with nine Steps.
Step 3 - Converting to Runthru Instruction Frames
Once the editing step is completed, it is a simple task to create Frames in the main part of the application. This section describes the action and the outcome.

If you close the Advanced Step Recorder window, and return in the same session, your work will still be here, and you can continue to add and edit. Also, if you close this window and then save this Runthru Instruction file, your work will be here when you next open the same file.

When you are ready to convert your work into Runthru Instruction Frames and Steps, press the Complete Capture and Convert to Frames button.

In the main window of Runthru Instruction, the new Frames and their Steps are added and available to edit as normal.
You can restart the recorder to capture additional steps for this file at any time.
This is the end of the instruction for creating Frames using the Advanced Step Recorder.
Appendix - Timing and Different Applications
There are differences between all software applications, and also different operating systems and individual computers. We need to be conscious of the different effects this can have on both screenshots and the positioning of the Steps and their rectangles, and make adjustments if necessary.
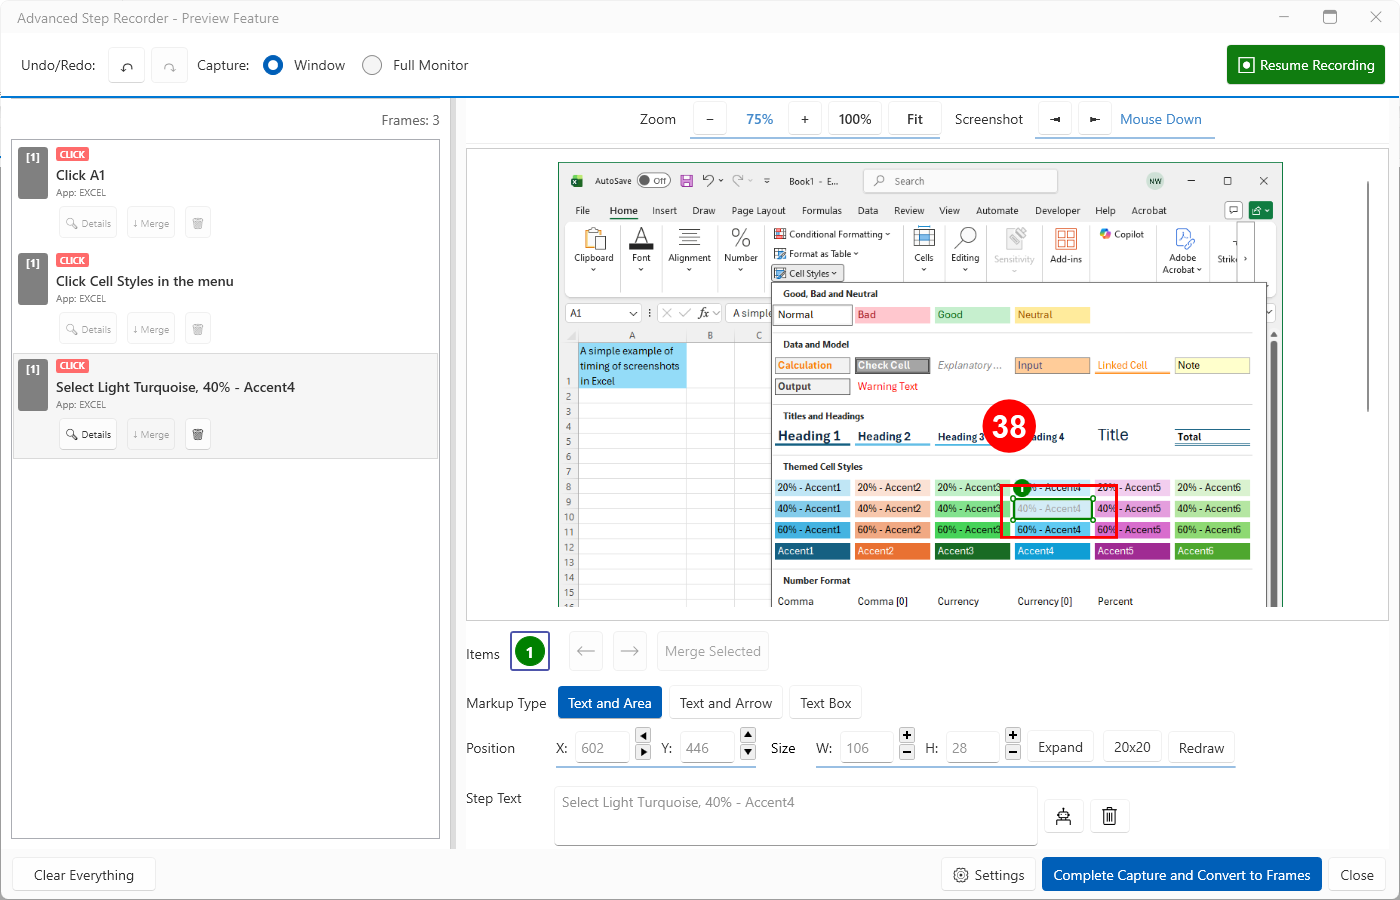

Here is a screenshot of the Advanced Step Recorder in Runthru Instruction showing a click on a theme style in an open menu in Microsoft Excel. This is the result that we are wanting, but we had to make an adjustment to make this appear correctly. We'll explain how this works now.
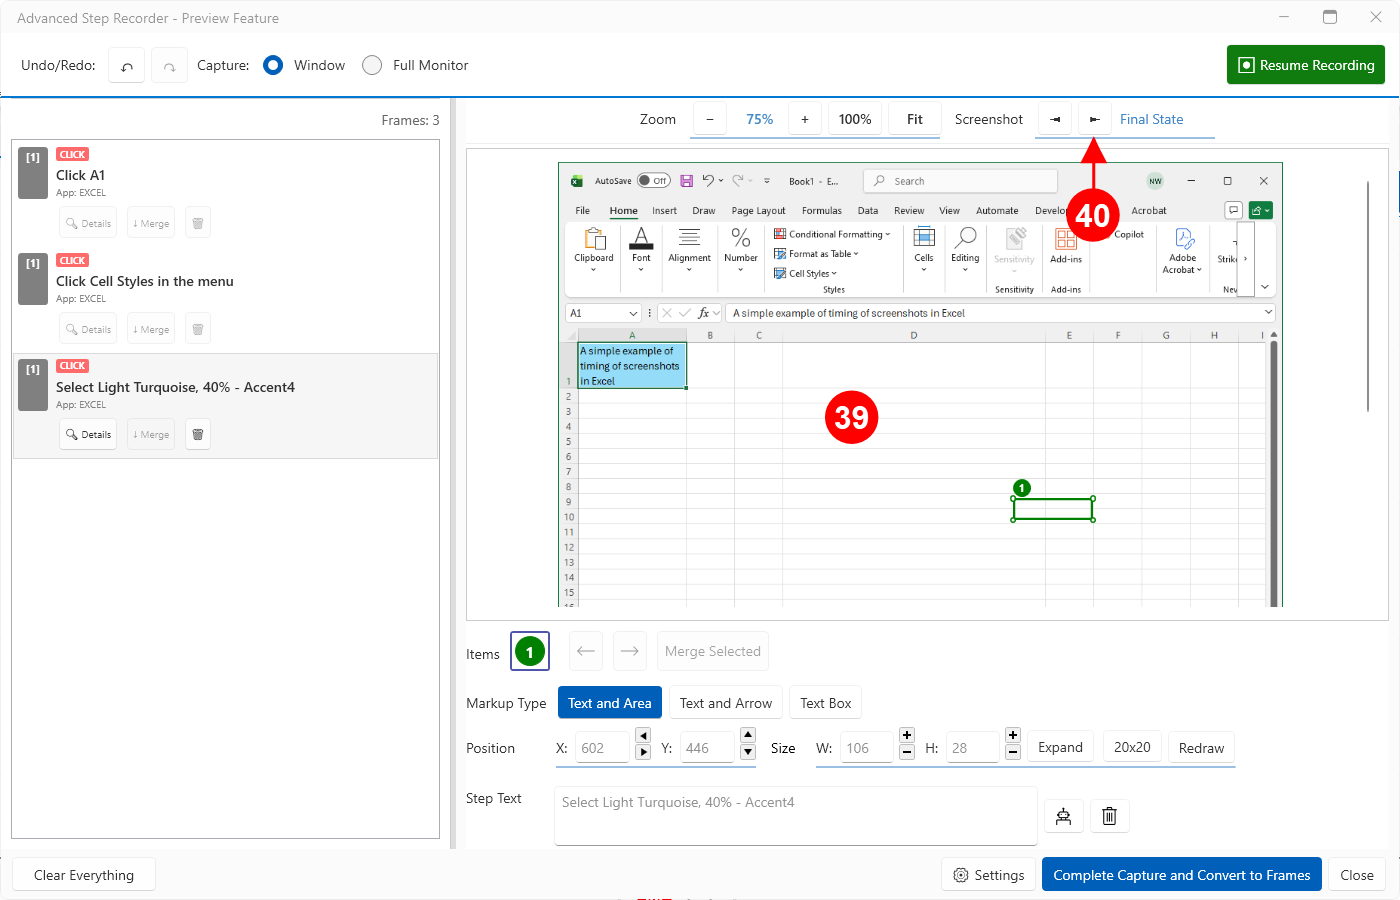

This was the screenshot as captured. The rectangle is in the right place, and the text is correct. Obviously the screenshot is wrong, it was taken after the menu disappeared.

In many cases this is easily fixed. Here in the window you will find an option to consider other screenshots that the application captured in order to overcome this type of timing issue. You can click through the options and see the screenshot taken as the mouse button was pressed down, then when it was released, and then another screenshot a moment after that. This 'bracketing' of images means that often you will find a perfect match.
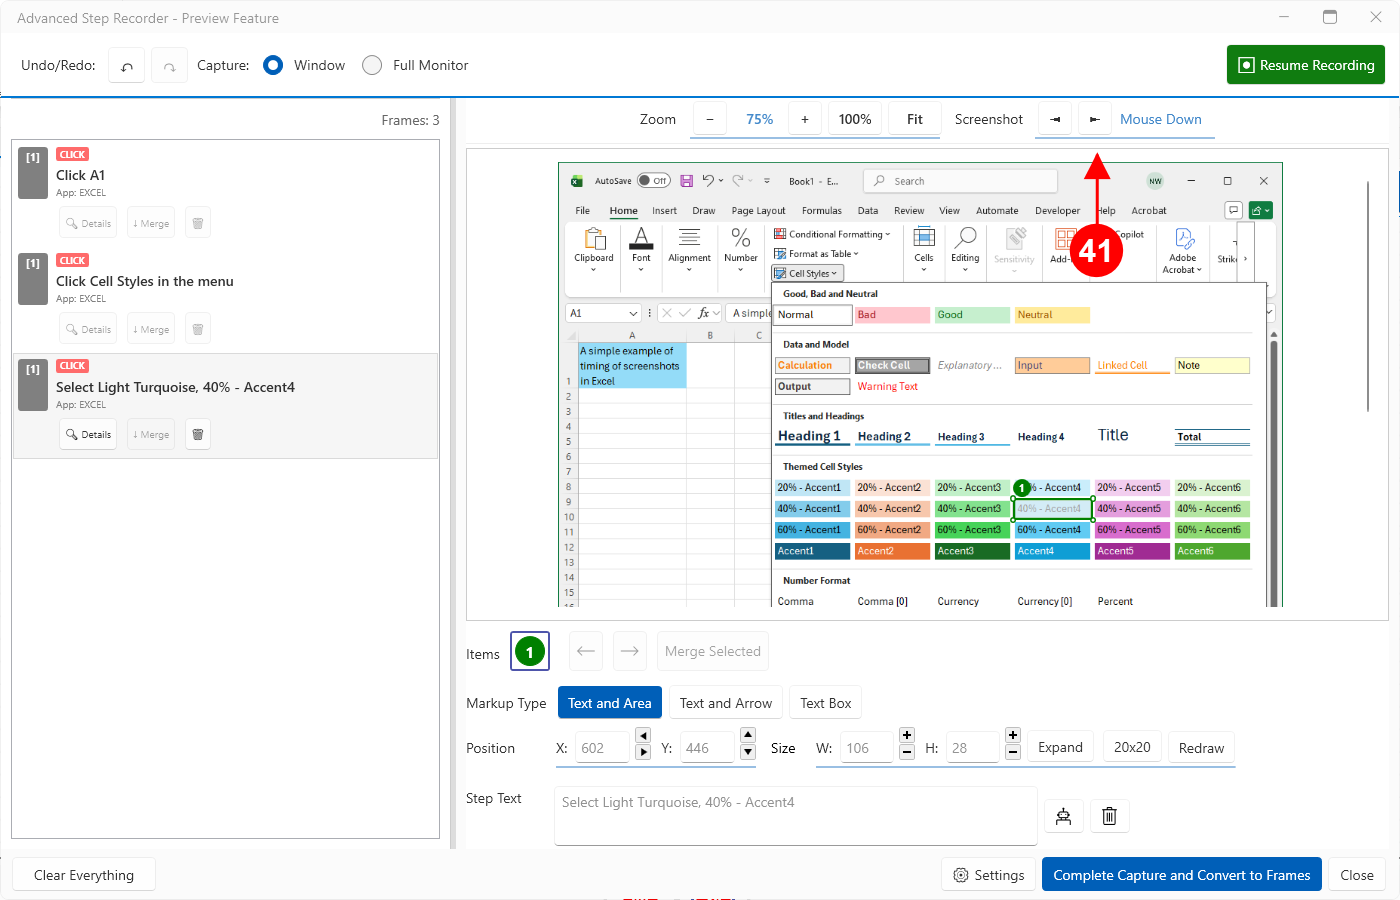

In this example, changing to the Mouse Down option gives us the correct result. That will not always be the case. In some situations the Final State option will be the correct choice. It is worth noting two other important pieces of information at this point.
Firstly, clicking slowly will spread out the time between these images and will give better alternatives. Secondly, the icon in the Advanced Step Recorder in the Windows Taskbar has a visual indicator that shows when the software is working on your Steps. Waiting for it to finish its work before you click again, will help produce a better result.
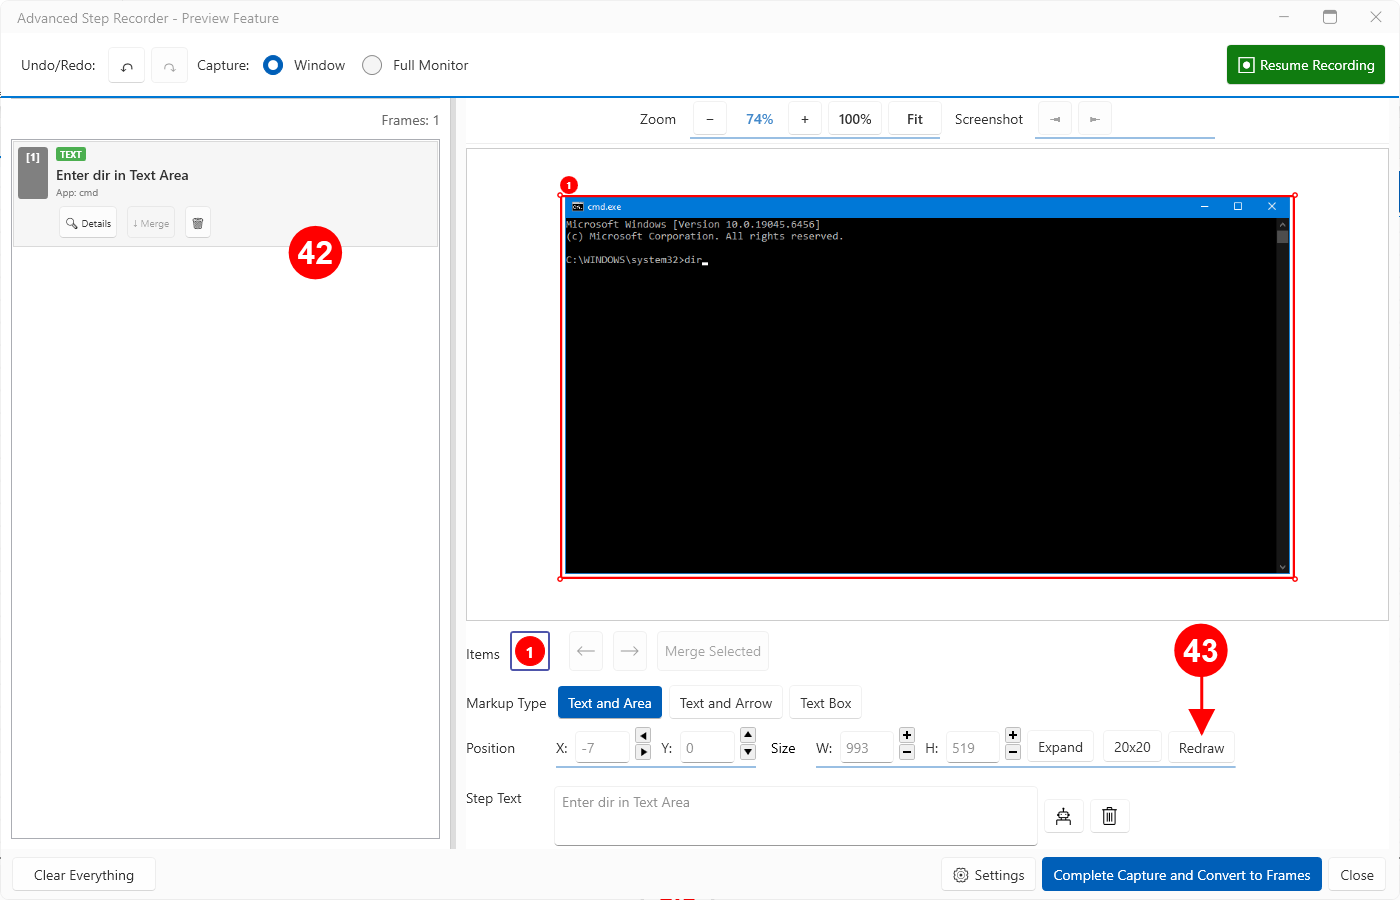

There can be situations where the Advanced Step Recorder cannot accurately detect the size or position of an object. This can happen where the target application is very complex, and also in situations such as this terminal screen. In either case, the rectangle is not positioned correctly and it should be manually redrawn to indicate the location of the user interaction.

Pressing the Redraw button, then drawing a new rectangle on the image in the right location will give an improved result.
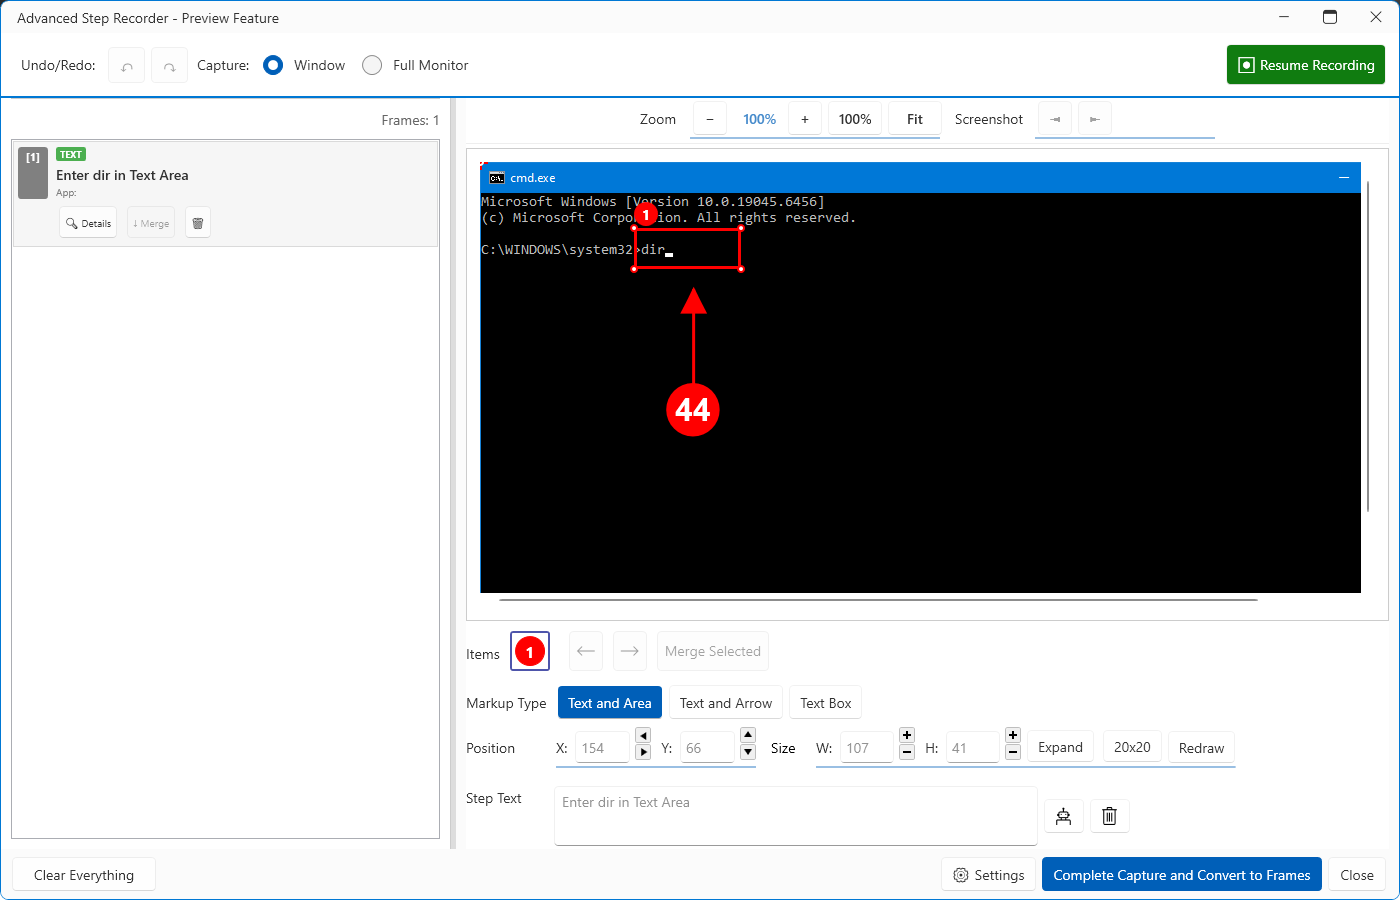

Here is the result of redrawing the rectangle to suit the actual user experience.
End
This is the end of the article.